What Soil Type Do You Have? 3 Ways to Find Out
 Whether you’re a seasoned gardener with a big vegetable plot or a flower-lover with lots of flower beds, one of the most essential predictors of your horticultural success is your soil type. Too sandy and it won’t hold enough moisture. Too clayey and it will be heavy and difficult to work with. Too silty and your plot will not drain properly. It’s tough to achieve just the right balance, but when you do, your green thumb will flourish.
The first step to improving your soil is understanding what soil type you have in the first place. There are 3 basic types of soil: sandy, clay, and silty. Ideally, you want a balance of all three ingredients, as they all have benefits when present in moderation.
1. The Squeeze Test
To do the squeeze test, wait until your soil is damp but not wet. Take a handful of soil and rub it between your fingers. If it feels gritty, it’s mostly sand. If it feels slick and smooth, it’s mostly clay.
2. The Roll Test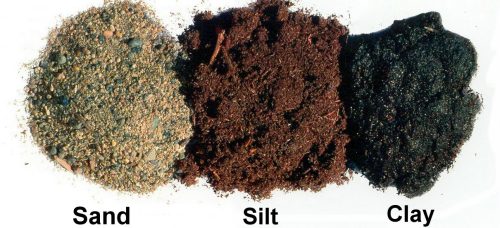
Another easy test is to take a small handful of damp (but not soaking wet) soil and roll it into a cylindrical shape between your palms. Then, try to hold it vertically without it breaking. If you can hold it vertically without it breaking, you have mostly clay soil. If you can roll it into a cylinder but it breaks when you try to hold it vertically, you probably have between 25 and 50 percent clay. If you aren’t able to even roll it into a cylinder, you have mostly sandy soil.
3. The Jar Test
This one is for all the scientist types out there. It takes a bit longer to do, but the results are much more accurate and more specific.
- Gather in a bucket soil samples from around your garden or flower beds. This will give you a sample that averages out the small variations that probably occur across your property.
- Mix them all together, and scoop out about a cup of the mixture.
- Spread the soil out on a flat surface and remove any roots, rocks, or other debris. Use something hard and flat to crush the soil into a powder, then let it dry completely.
- Put a one-inch thick layer of this soil into the bottom of a quart-sized clear glass jar.
- Fill the jar two-thirds of the way up with water, then add either a pinch of salt or 1 tsp. of liquid dish detergent. This will help the soil particles separate from one another.
- Shake vigorously.
- Set the jar down and let the soil particles settle naturally into layers. The sand will settle quickly and form the bottom layer. After a few hours, the silt will settle and form the next layer. You should be able to see the difference between the large sand particles and the smaller silt particles. The clay can take as long as several days to fully settle.
- Once everything has settled, measure the total height of the soil sample and the height of each layer. You can then calculate the percentage of your soil that each soil type comprises. For example, if the soil is 1 inch thick and 1/2 inch is sand, your soil is 50% sand.
Once you have identified what kind of soil you have, you can find ways to optimize it for planting. While there are different short-term and long-term tactics you can take to improve each type, there is also one key trick that will improve all three types. Check it out here!
Want to learn more about DR Roto-Hog Power Tillers?
Order your FREE Buyer's Guide & DVD!
What's inside
- 24-Page Buyer's Guide
- Action-Packed DVD
- Money-Saving Promotions