How to Build a Walkway in 5 Easy Steps
 Walkways are an attractive and useful addition to just about any property. Whether it’s an aesthetically appealing stone walkway around your home, or a utilitarian gravel path heading from your house to your barn, paths and walkways serve a number of purposes. In high-traffic areas of your lawn, they look much better than flattened, dead grass. In the winter, they save your lawn from the torture of a plow or snow blower. And in rainy weather, I know I’d rather walk on a stone walkway than on the soggy grass!
It’s not as difficult as it may seem to build a walkway on your property. Building a walkway or path requires just a few steps:
1. Choose your location and materials.
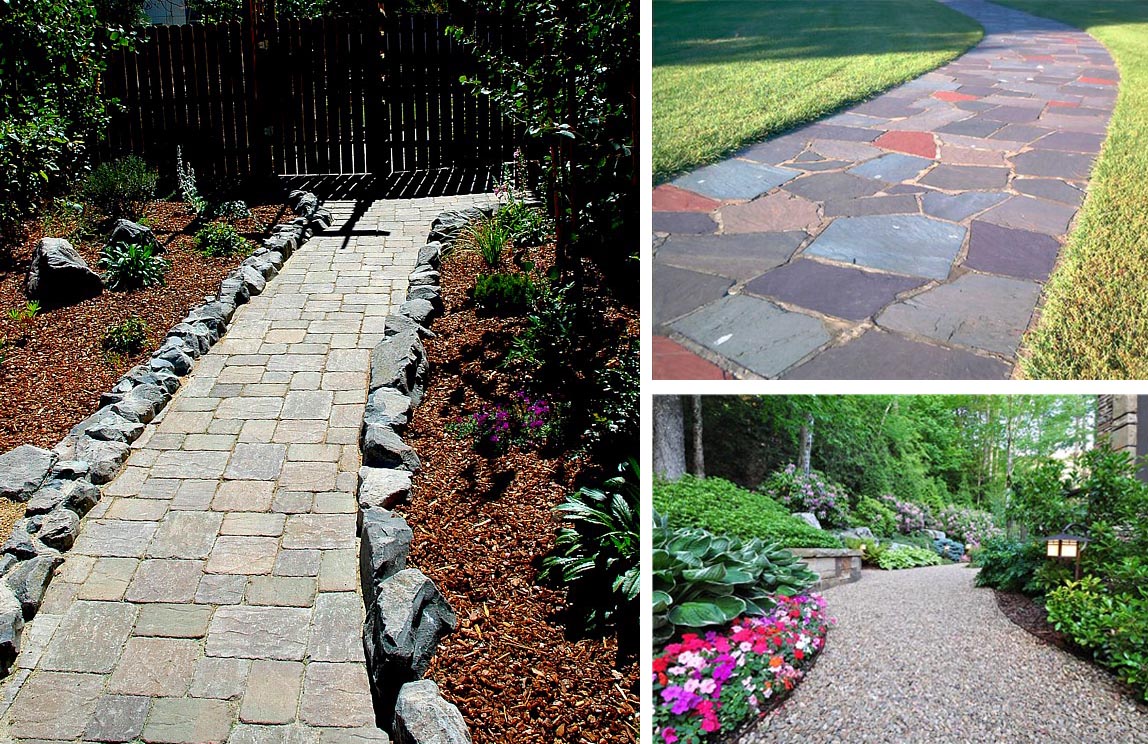
This will probably be pretty obvious if you have already considered adding a walkway or path to your yard. But in case you haven’t decided, start by considering where you could most benefit from a walkway and what material would look and function the best. Consider areas that see a lot of foot traffic, the path you often take when bringing wood into the house during the winter, or where a walkway would look best within your landscape. Adding a walkway can even be a way to add value to your property, as homes with well-landscaped yards often have significantly higher price tags than those without any landscaping. As far as materials, consider brick, cut stone, natural stone, gravel, crushed stone, or mulch. Look at each material’s price and practicality for its location as you decide.
2. Stake it out.
Use garden stakes with string tied between them to mark the path. Or, for curvier walkways, mark the boundaries with a garden hose or rope.
3. Dig it up.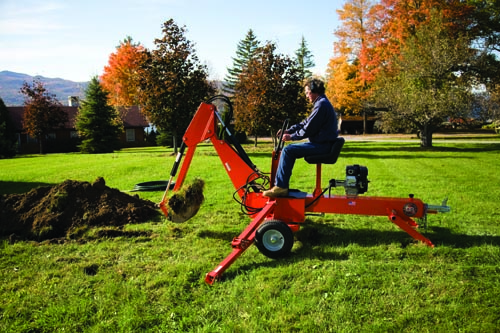
In most cases, you’ll need to dig out at least 4 inches of earth to lay a layer of gravel underneath your preferred walkway material. This will allow it to drain properly, keep it level, and save it from sinking or shifting over the years. For climates where the ground freezes, dig down 5″ to 8″. If you live in a milder climate, 4″ will suffice. The DR Towable Backhoe is a great tool for this type of project because it’s small enough to fit into tight spaces, has interchangeable buckets so you can choose the size that’s best for your project, and gets the job done much more quickly than digging by hand.
4. Add a base layer.
Once you’ve dug out the walkway to the appropriate depth, line the edges with a flexible metal edging (available at hardware stores). Then, fill with gravel or crushed stone, ensuring that it is level and slightly higher at the center than at the edges. This will allow water to drain off the walkway. You may also want to add a layer of sand over the base layer of gravel, depending on your final chosen walkway material. For example, this will make laying stone a lot easier, because you’ll be able to nestle each stone into just the right position.
5. Lay your chosen material.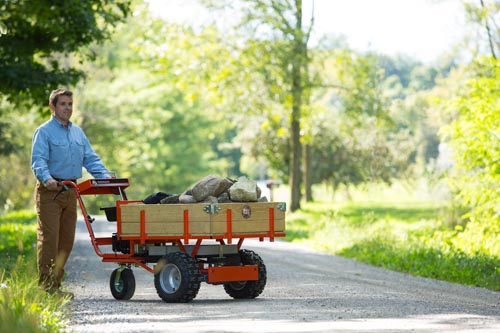
Finally, lay your stone, brick, mulch, or other material over the top. Make sure it’s level and arranged just the way you like. Transporting materials like this, as well as your base layer of gravel, are projects that the DR Powerwagon is a boss at. Haul up to 800 lbs. over just about any terrain with almost zero effort – all you do is steer, and the DR does the rest!
Want to learn more about the DR Power Equipment line-up?
Order your FREE catalog!

What's inside
- Information about the full line of DR equipment
- Money-saving promotions
- Product ordering information