Take the Plunge! Tips for Building a Pond

Whether for decorating a dull area, raising fish, summer swimming, or winter ice skating, a backyard pond is a fun and beautiful landscaping element to add to your property. And water gardening — nurturing aquatic plants in your pond — is one of the easiest ways to garden because there’s no hoeing, no weeding, and no watering! There are countless different types of ponds to choose between: from large bodies great for skating and swimming to small pools for aquatic flowers and accenting your landscape. Here are some important things to consider when building a pond on your property.
- Choose your pond site. For a pond whose primary purpose is decorative, choose a site that works with your other landscaping elements. It should blend in and accent the surrounding area, whether that means a more formal pond to go with your manicured property, or one that looks like nature created it to go with your more natural landscape. Other things to consider are sunlight (it should be in a place where it will receive at least 3 hours a day of direct sunlight) and proximity to overhanging trees (foliage that drops into the pond will decay and make the pond’s upkeep much more difficult). Avoid areas where water naturally runs or collects, as it could contain herbicides, pesticides, and fertilizers that can harm plants and fish.
- Shape up! After choosing a site, think about what shape you want the pond to be. Lay a rope or garden hose down where you think you want the perimeter of the pond. This will help you to visualize how it will ultimately look. Design features such as scalloped edges or a narrowed center may look good on paper, but lose some of their appeal when not viewed from above.

- Excavate. Before you even start digging, it’s a good idea to contact DigSafe, even if you’re only planning a pond a couple feet deep. DigSafe is a free service that alerts utility companies in your area of your proposed dig site and they in turn come and mark the locations of their underground facilities so you can avoid them when digging. It can help you to avert a costly and very inconvenient collision with a water or phone line. When you’ve checked with them and are confident with your dig site, start digging your pond inside your marked area, leaving a little space available for evening out the edges later. The depth is up to you, but dig about an inch deeper than you’d like the pond to be. Consider leaving a shelf around some of your pond’s edges if you want to grow bog plants, irises, or lotuses that prefer shallow water (9 to 12 inches). Depending on the size of your pond, there are many digging options available. Hand-digging with a shovel, renting a backhoe, or purchasing a backhoe designed for homeowners, such as the DR Towable Backhoe. The bottom of the pond should be generally flat, but slope slightly towards one end or the other to allow for easy pumping. Inspect the walls and floor for sharp rocks, tree roots, and other protrusions that could cause damage to your liner.

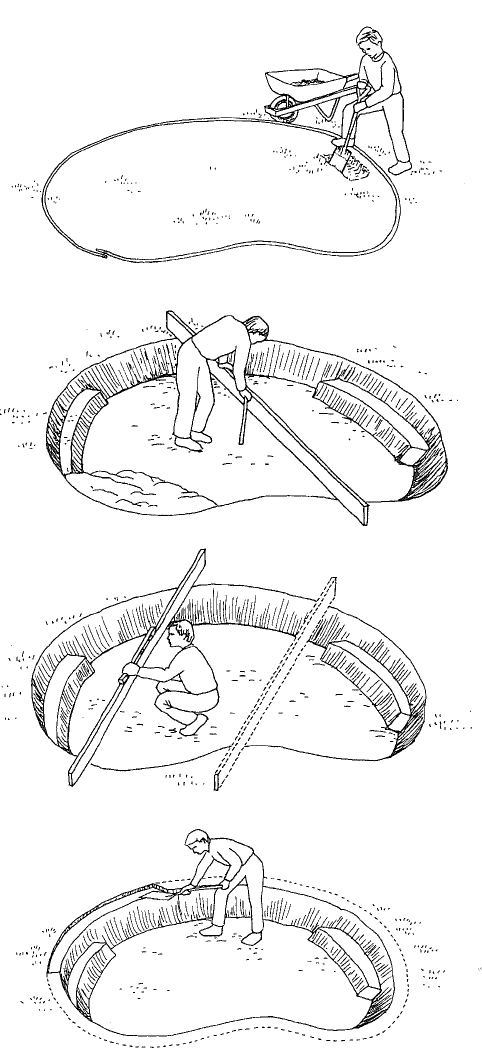
- Make sure it’s level. To ensure that all the edges of your pond are level, place a 2″x4″ board on edge across the excavated area. Place a carpenter’s level on top of the board and move it to various places around the rim, ensuring it stays level. Move soil from high spots and fill in low spots if necessary.
- Fit the liner and fill with water. Liners are generally made of PVC or rubber and area available at garden supply stores and many nurseries. They will keep your water from seeping into the ground and ensure
 that you have the most control over the quality of your water. After unfolding the liner, drape it loosely over the excavated area, weighting the edges with stones or bricks as you fill the pond with water. The water will make sure the liner fits snugly in place. Unfortunately, there is no way to 100% get rid of folds in the liner, but you can try to smooth them out as best you can. Once the pond is full of water, use a pair of heavy-duty shears to cut away the extra liner around the pond’s perimeter, leaving a 6″ to 12″ flap around the pond’s perimeter.
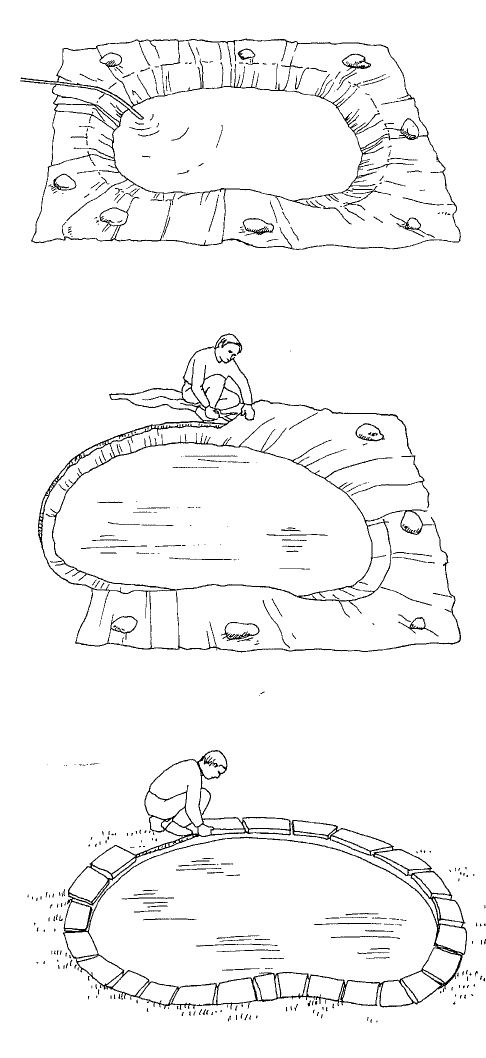
- Lay the coping. Coping is the layer of stone or bricks that covers that 6″ to 12″ section of excess liner, holding it in place. Depending on the aesthetic that you want, choose a coping material and lay it around the perimeter of the pond, on top of the liner flap.
- Flowers, fish, and more! Now comes the fun part. Waterlilies and lotuses look fantastic in backyard ponds, but there are other options as well, such as submerged plants and decorative mosses. Goldfish and koi are common fish additions, but there are hundreds of other species that are equally as lovely to look at and easy to care for. Be sure to research the species that you wish to put in your pond and create an environment that suits their needs.
Want to learn more about the DR Power Equipment line-up?
Order your FREE catalog!

What's inside
- Information about the full line of DR equipment
- Money-saving promotions
- Product ordering information